Hello there and welcome back! Excited to dive into today’s topic!
Let me set the stage with a bit of a nightmare story time. Last Thursday night, the power went out at my home for about 5 hours. My UPS kicked in exactly as it should, giving me enough time to gracefully shut down my servers and networking gear. Eventually, the power came back.
Friday morning rolled around, and initially, everything looked good. My firewall, access points, Raspberry Pi DNS, switch, and Proxmox server were all seemingly up and humming. I got on with my day and started working. Come Saturday, I thought to myself, “After this outage, it’s probably a good time to get some fresh backups of current configs and VMs.”
There was just one problem… Proxmox was not up.
Browser timed out. Was I hitting the right URL or IP? Yes. Could I SSH into it? Nope. Could I even ping it? Absolutely not. Oh boy, I was in for a trip.
After about three hours of troubleshooting, “escalating” to god-tier support (also known as my wife), reading a bunch of Reddit threads, Stack Overflow, Proxmox forums, and consulting with a few of my favorite AI Chatbots, I finally found the winning combination to bring my hypervisor back from the dead.
I’m sharing this guide so that if you ever find yourself in a similar situation and specifically dealing with Proxmox failing to boot after setting up GPU passthrough (like an NVIDIA graphics card), you can easily recover it without completely reinstalling from scratch.
- Prerequisites
- Step 1: Edit GRUB to Access a Root Shell
- Step 2: Remount the Filesystem
- Step 3: Disable VFIO and GPU Passthrough Configurations
- Step 4: Update Initramfs and Reboot
- Conclusion
Prerequisites
- Physical access to your Proxmox server: This cannot be done remotely if the network interface is down.
- A monitor and keyboard: Directly connected to your Proxmox host.
Step 1: Edit GRUB to Access a Root Shell
If Proxmox is hanging on boot, we need to bypass the normal startup sequence and drop directly into a bare-bones root shell.
- Connect your monitor and keyboard.
- Hard reboot the Proxmox host.
- When the GRUB boot menu appears, make sure the first boot option (your regular Proxmox version) is highlighted.
- Press the letter
eon your keyboard to edit the boot parameters. - Look for the line that starts with
linux. It will have a lot of content after it. - Use your arrow keys to navigate to the very end of that
linuxline and append the following text:
init=/bin/bash- Press
CTRL + Xto boot with these modified parameters.

You will have to wait a little bit… sometimes up to 5-10 minutes. Eventually, you should be dropped into a root@proxmox:# shell prompt.
Note: The
init=/bin/bashparameter tells the Linux kernel to execute the Bash shell directly as the first process (PID 1) instead of the standardsystemdinit process. For more information on kernel parameters, refer to the official Linux kernel documentation.
Step 2: Remount the Filesystem
When you drop into the shell this way, the root filesystem is typically mounted in read-only mode to prevent accidental corruption. Since we need to make some configuration changes, we must remount it with read/write access.
Run the following command:
# Remount the root filesystem in read/write mode to allow edits
mount -o remount,rw /
Step 3: Disable VFIO and GPU Passthrough Configurations
The boot issue in my case was caused by the system trying to initialize the VFIO (Virtual Function I/O) modules for my NVIDIA GPU passthrough before the system was fully ready. We need to disable these modules.
First, let’s navigate to the modprobe directory and see what configuration files are present:
ls -l /etc/modprobe.d/You might see files like vfio.conf, iommu_unsafe_interrupts.conf, or blacklist.conf. You can check what is inside them using cat:
# Example check of the VFIO config
cat /etc/modprobe.d/vfio.conf
# Output: options vfio-pci ids=10de:2487,10de:228b disable_vga=1
I renamed (backed up) my specific VFIO configs to prevent them from loading:
ls -l /etc/modprobe.d/

total 20
-rw-r--r-- 1 root root  52 Jul 10  2025 blacklist.conf
-rw-r--r-- 1 root root  51 Jul 10  2025 iommu_unsafe_interrupts.conf.bak
-rw-r--r-- 1 root root  26 Jul 10  2025 kvm.conf
-rw-r--r-- 1 root root 172 Apr 23  2024 pve-blacklist.conf
-rw-r--r-- 1 root root  55 Jul 10  2025 vfio.conf.bak
Next, and most importantly, we need to stop Proxmox from loading the kernel modules at boot time. Open /etc/modules using your preferred text editor (like nano or vi):
nano /etc/modulesComment out any lines related to vfio by adding a # at the beginning of the line. Your file should look something like this when you are done:
# /etc/modules: kernel modules to load at boot time.
#
# This file contains the names of kernel modules that should be loaded
# at boot time, one per line. Lines beginning with "#" are ignored.
# Parameters can be specified after the module name.

#vfio
#vfio_iommu_type1
#vfio_pci
#vfio_virqfd
Save and exit (CTRL + O, Enter, CTRL + X if using nano).
Step 4: Update Initramfs and Reboot
Since we changed the boot modules, we must reconstruct the initramfs (Initial RAM File System) so the kernel knows about our changes during the next boot phase.
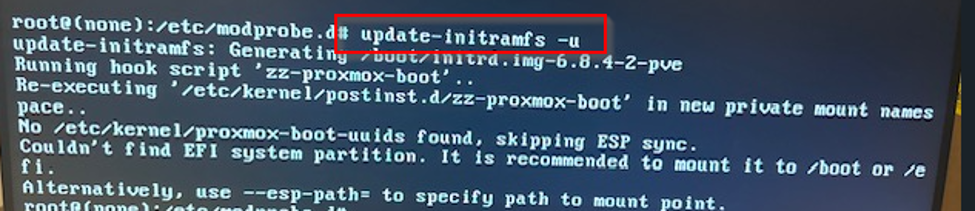
Run the following command:
# Reconstruct/regenerate the initramfs
update-initramfs -u
Once that completes successfully, you can reboot your server simply by typing reboot (or doing a hard reset if the command isn’t accepted in that specific PID 1 shell state).
Conclusion
That did it! After a bit of waiting, my Proxmox box was back up, responding to pings, and I could finally access the Web GUI from my browser. What a night… and day.
Troubleshooting hardware issues can be extremely frustrating, I would say even more so when you work most days in < name your magical cloud for which you don’t need to maintain hardware ; )> but knowing how to drop into a root shell and manually modify your kernel modules is an invaluable skill for any sysadmin.
I hope this helps you get your hypervisor back online! Let me know if you’ve ever found yourself in the weeds of GPU passthrough or other painful hardware/middleware configurations.
See you next time!
Q: “What if I genuinely need the graphics card on my server?”
A: I’m in the same situation too lol let me know if you have found an answer, I will try diving into this after getting all my backups completed 😉