Hello everyone, and welcome back! Excited to dive into today’s topic! It has been a little while, but I thought this might be helpful to some of you looking to get a little extra horsepower for your existing workloads. We will be looking at the straightforward steps to upgrade your Ubuntu VM running in Azure (though this applies to pretty much any distribution) with both an increased OS Disk size and a newer SKU granting more RAM and CPU. It’s a rather simple task but I believe that even in the simple things, you can always help someone 🙂
Consider this your quick guide to scaling up without breaking a sweat!
Table of Contents
- Prerequisites
- Step 1: Take a Backup Snapshot
- Step 2: Stop and Deallocate the VM
- Step 3: Upgrade the VM SKU (Compute Size)
- Step 4: Increase the OS Disk Size
- Step 5: Start the VM & Verify
- References & Documentation
Prerequisites
Before we begin, you just need a few basic things:
- An active Azure Subscription.
- Appropriate permissions (Contributor rights or higher) over the Virtual Machine and its Disk.
- Access to the Azure Portal or Azure CLI/PowerShell for verification.
Step 1: Take a Backup Snapshot
Before performing any structural changes to a VM, you should always take a backup. If things go sideways during the upgrade (and sometimes they do…) a snapshot gives us a quick rollback option.
- Navigate to your Virtual Machine in the Azure portal.
- Select Disks in the left-hand menu.
- Click on the name of your OS Disk.
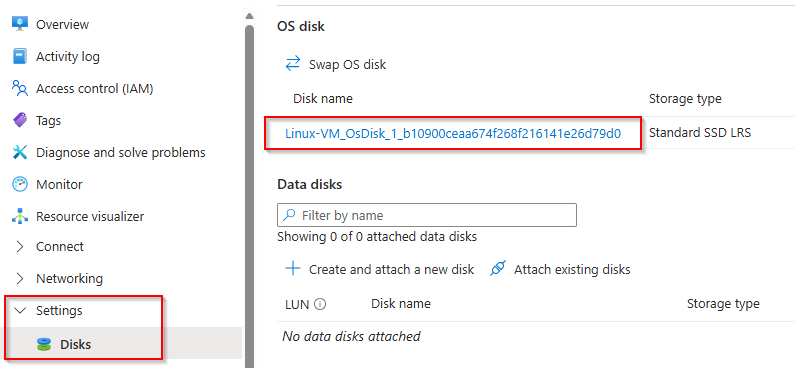
4. On the disk overview page, click Create snapshot at the top.

5. Follow the prompts to name and save the snapshot, select snapshot type: “Full”, you may use the rest of the default settings. (You may disable public access and re-enable it if you need to access it later / You may also select a different storage type but for most cases you can go with “Standard HDD”)
Step 2: Stop and Deallocate the VM
Azure needs your virtual machine to be completely stopped and deallocated to change its active compute node and adjust disk sizes.
- Go back to your VM’s main Overview page.
- Hit the Stop button.
- Wait until the Status updates to Stopped (deallocated).
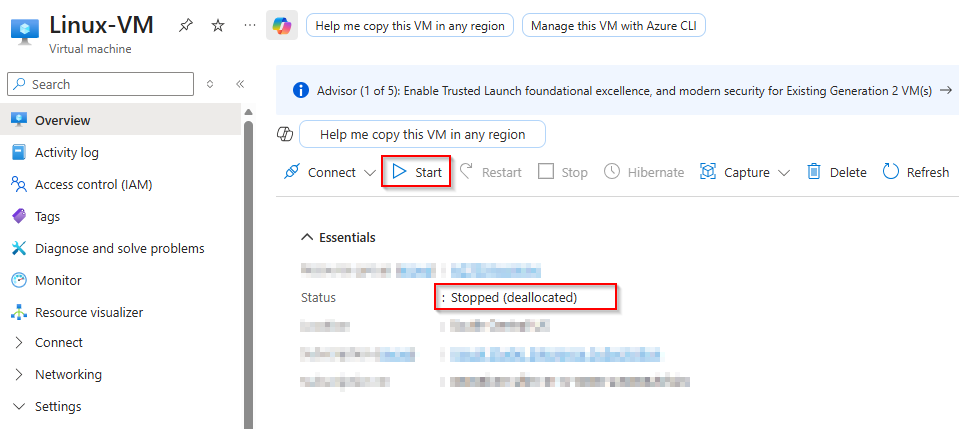
(Note: Just shutting down the OS from inside the VM leaves it in a “Stopped” state, which isn’t enough. It must be deallocated)
Step 3: Upgrade the VM SKU (Compute Size)
Now we can choose a new size to attach more RAM, vCPUs, or both.
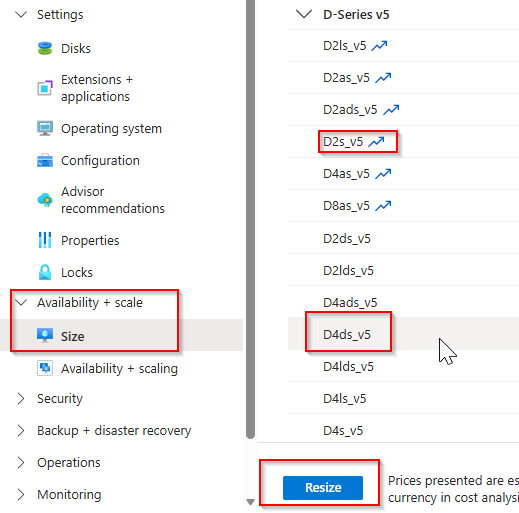
- On your VM’s left-hand menu, scroll down into the Settings section and select Size.
- Browse or search the available SKUs for your target specifications.
Pro tip: Staying within the same specific family (e.g., jumping from a D2s_v4 to a D4s_v4) guarantees higher compatibility and typically goes quicker. Changing architectures may have downtime or compatibility nuances depending on your specific image. - Select your desired size and click Resize at the bottom.
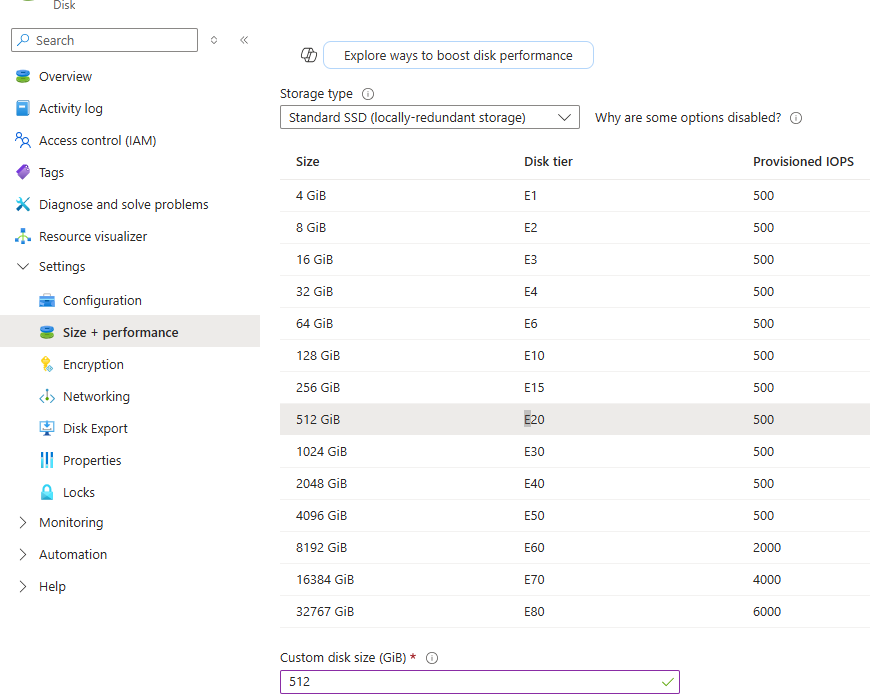
Step 4: Increase the OS Disk Size
Next, let’s give the OS a bit more breathing room by expanding its storage block.
Important Note: In Azure, you can only increase disk sizes, never decrease them in place. If you ever need to shrink a disk, you will need to create a new disk from your snapshot and swapping the OS disk.
- Go back to your VM’s menu and select Disks, then click on your OS Disk.
- In the disk menu, under Settings, select Size + performance.
- Pick the new size you want.
- Click Save at the bottom.
Step 5: Start the VM & Verify
Time to wake up your upgraded VM and make sure the changes took effectively.
- Navigate back to your VM’s Overview page and hit Start.
- Once the VM is running, SSH into your Ubuntu instance.
- To verify that your OS disk has increased appropriately, run the following commands:
# Check block devices and their sizes
lsblk
# Verify the filesystem sees the new space
df -hFor the latest Ubuntu distributions running in Azure, the partition expansion typically occurs automatically upon boot. If you are on an older distribution or a different OS entirely, you might need to run partitioning utilities (like fdisk, parted, or growpart) manually.
Conclusion
And there you have it! A bigger, faster VM ready to handle its new workload, securely upgraded with a rollback point in place. It’s an easy process but one you want to do carefully to avoid operational headaches 😉
Thanks for tuning in, keep on learning and take much care!