This is a lab that I’ve wanted to do for some time, I’ve found many guides that walk you through how to set up a VPN tunnel between an Azure VPN Gateway and a PFSense Firewall. But not one that includes how to set up this tunnel to use BGP. Without further addition, let’s get in action!
Lab Diagram:

- VPN Gateway configuration
- PFSense
- Troubleshooting/Tips
- About BGP with VPN Gateway – Azure VPN Gateway | Microsoft Learn – General details about BGP connections for VPN Gateways.
- Configure BGP for VPN Gateway: Portal – Azure VPN Gateway | Microsoft Learn – Configuration walkthrough document.
- About VPN devices for connections – Azure VPN Gateway | Microsoft Learn – Supported devices, configurations, and default VPN Gateway connection parameters.
- Go to VPN > IPsec > Tunnels
- Create a Tunnel’s Phase 1.
- For Remote Gateway, use the public IP of your VPN Gateway.
- Enable FRR
- Services > FRR Global/Zebra > Check “Enable” box
- Setup a master password (This can be anything)
- Save
- Configure route maps
- Services > FRR Global/Zebra > Route Maps
- Note: For this lab, I will allow all routes to be exchanged, however for production environments or more granular configurations, you may set them here.
- Name: Route’s map name.
- Action: Permit.
- Sequence: 100
- Rest of the settings: Default
- Save
- Go to Services > FRR BGP
- Enable BGP routing checkmark
- Setup local AS: In my case 65000
- Router ID: 10.0.0.1 <Your private IP>
- Networks to distribute: 10.0.0.0/16 <Your private’s subnet range>
- Save
- Services > FRR BGP > Neighbors > Add
- Name/Address: 10.55.254.254 <BGP Peer IP of VPN Gateway>
- Remote AS: 65515
- Route Map Filters: Allow-All-traffic
- Rest of settings: Default
- Save
VPN Gateway: Before getting started, you may want to consider the following documents:
For our VPN Gateway on Azure, I will be deploying it in North Central US with the following settings:

Note: ASN 65515 is part of the reserved ASNs used by Azure, and is also the default option when enabling BGP, for more info check out this document.
This deployment took around 30-60 minutes to complete for me. Once completed, we will need to deploy a “Local Network Gateway” to use it as a logical representation of our remote network. To use BGP on it I will use the following settings:

I will use 65000 as the private ASN for my remote device.

Go to your VPN Gateway > Connections > Add.
Configure the connection’s settings.

This should be all we need from this side! Now, let’s go check our PFSense firewall.

For phase 1 encryption, I will be using the following settings:

The rest of the settings I will leave them as default. Finally, click save.
Then, we will add phase 2 settings as follows:


Note: For the local network, we will use the private IP of our Firewall, for the remote network, we will use the private BGP IP of Azure’s VPN Gateway (VPN Gateway > Configuration).


Awesome! That should take care of the VPN tunnel, now let’s move to the BGP settings.
BGP: In order to configure BGP we will need to install the FRR Package, this will allow us to configure dynamic routing protocols.
For this, we can go System > Package Manager > Available Packages > Search “frr”
Once the package is installed, it’s time to setup BGP:

Next, we will enable and configure BGP:


Now, we will need to configure Azure’s VPN Gateway as our BGP neighbor:


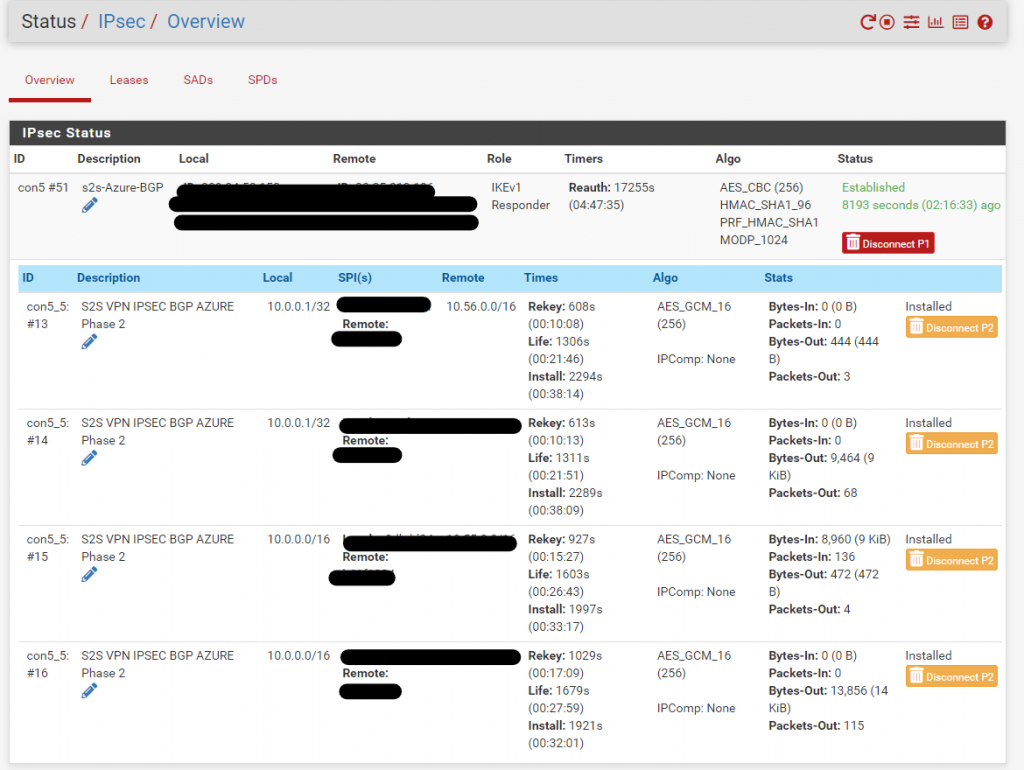
That should be all! To confirm this is working, you can check your VPN IPsec status. Go to Status > IPsec.
It should show as “Established”.

We can also see the learned routes if we go to Services > FRR BGP > Status.

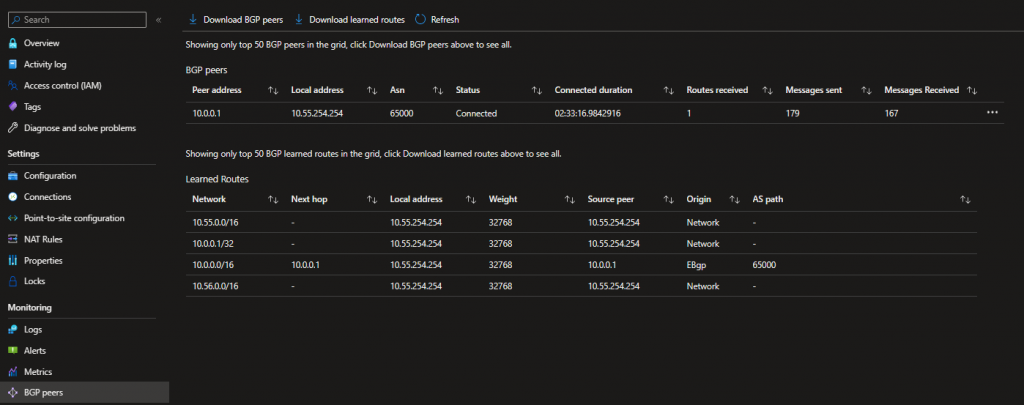
From our VPN Gateway, we should be able to see similar information:
Connectivity (This may take a few minutes to show the correct status):

BGP Peers / Routes:

And of course, do some real testing such as trying to RDP/SSH or ping into one of your Azure VMs.


Troubleshooting/tips: If for any reason your tunnel fails to get established, double check your IKE settings, and Pre-shared Key (PSK), and make sure you have the correct IPs all set up, similar to the above screenshots.
PFSense includes the following: Troubleshooting — Troubleshooting IPsec VPNs | pfSense Documentation (netgate.com)
You can check the logs in Status > System Logs > IPsec

From Azure, we also have many options in our favor, to check IPsec/IKE logs, we will need to enable diagnostic settings and save our logs to a location such as a Log Analytics Workspace (LAWs) or storage account.
It will take a few minutes (10-20) before we start getting logs populated, but once they are ready we could use them to get more insight into our troubleshooting:
For instance, I set it up to use a LAW in the same region, we can go to it and then logs and run queries as shown in this article:

Or you could always take packet captures from VPN Gateway > Help > VPN Gateway Packet Capture:

And that should be it for now, thank you so much for reading, and hope to see you a next time!
