After some time looking into different NVA solutions offered in Azure such as Palo Alto, Citrix, Cisco, Fortigate, Juniper, and a long list of etc, I got intrigued by how it is possible to use a Virtual Machine to act as a router/firewall/VPN concentrator, one thing that most of these offers have in common is that they usually run a Linux/Unix-based OS under the hood. With this premise in mind, I implemented a lab running a Linux NVA in Azure to act as a Router/VPN Concentrator and perform SNAT and S2S VPN connections.
Note: This lab was created for testing and experimental purposes, the following scenario is intended for projects or PoC scenarios as it is not suitable for production-ready environments.
For this lab, I will use the following infrastructure:
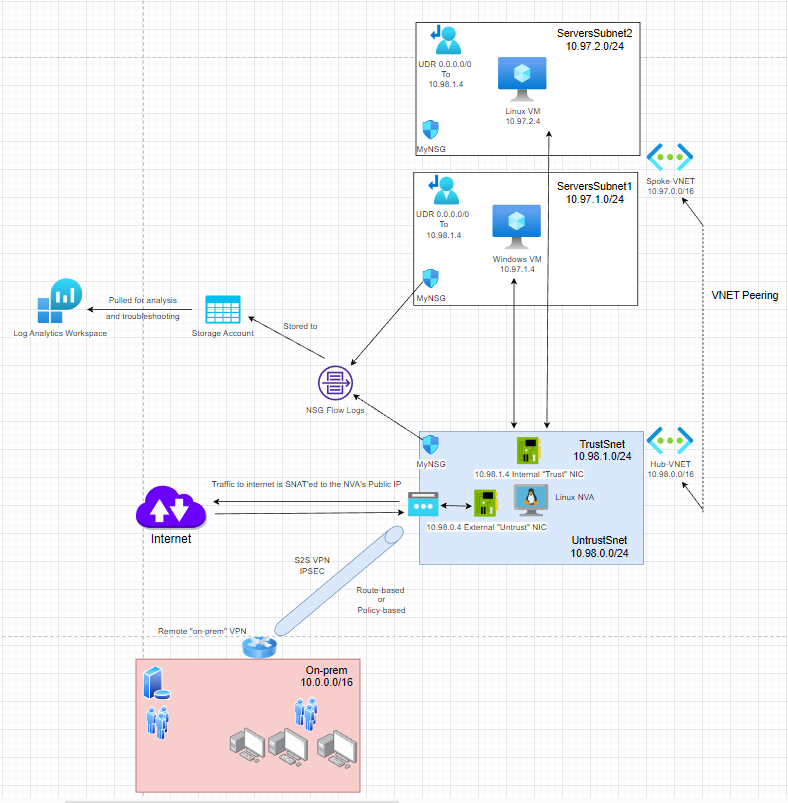
I will deploy the resources above using Terraform, I will leave the GitHub repo in case you want to do the same, you can also recreate them using the Azure portal.
There are a couple of pieces to this puzzle, first thing first let’s start with our requirements, for this lab, I would like to:
- Ensure the server within the subnets in the Spoke-VNET uses the Linux NVA as their next hop for spoke-to-spoke communication. (In theory, for “inspecting” traffic and keeping it secured).
- Make sure the devices in the Spoke-VNET can reach the internet with its next hop being the Linux NVA (Ex: Windows VM ——–Next hop 0.0.0.0/0——-> Linux NVA ——-SNAT——-> Internet).
- Create a Site-to-Site VPN to allow the Spoke-VNET servers to communicate with the “On-prem” network and vice-versa.
So with that defined, let’s get started!
First, I will deploy the above infrastructure with Terraform (I will not cover how to set up Terraform in this lab, but you may find help to set it up here). So once Terraform is installed, we are running our initialization and deployment commands:
# Initialize deployment - initializes a working directory containing Terraform configuration files
terraform init
# Makes a "plan" of our deployment (Think of it as a preview of what our deployment will do, it will check the syntax for errors and allow us to check the resources that will be deployed but without deployed them yet)
terraform plan -out main.tfplan
# Applies our deployment plan
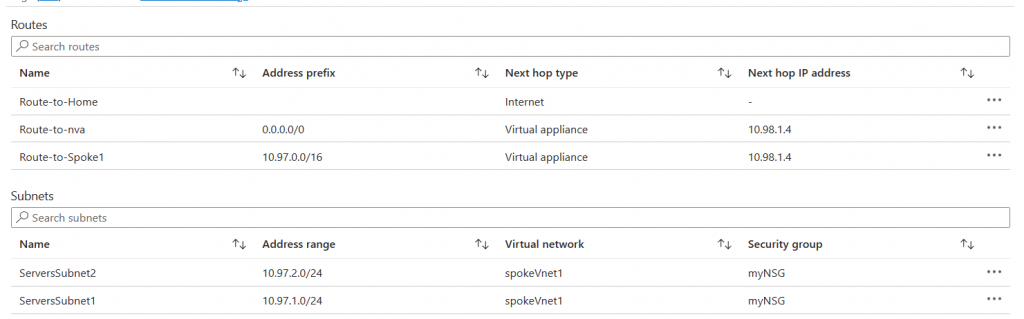
terraform apply "main.tfplan"To comply with the first requirement, we need to connect the spoke and hub VNETs using VNET peering and we need a custom route (UDR or User-Defined Route) associated with the subnets of the spoke VNET. Terraform is taking care of this part for me, but for demonstration, this is how it looks from the portal:
UDR Routes and Subnets:
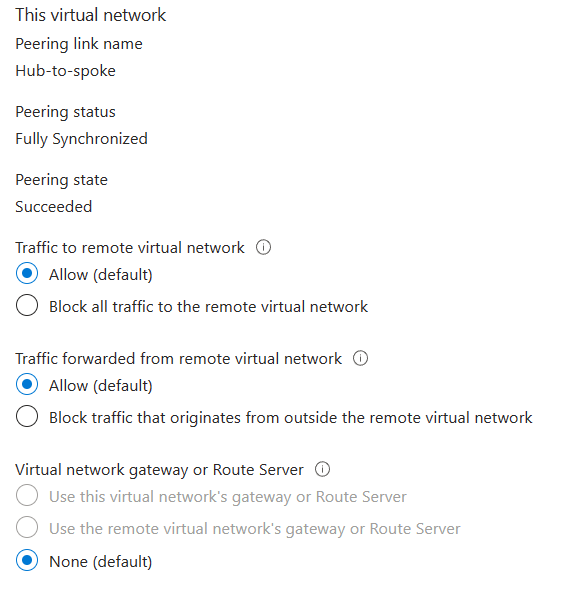
VNET Peering connecting Spoke and Hub VNETs:

Settings of VNET peering:
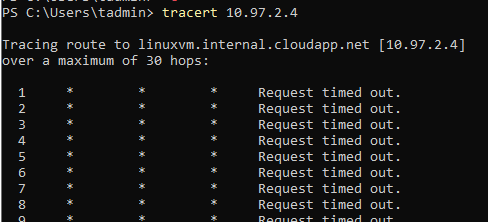
Ok, so that’s there, but is it actually working? Let’s try connecting to our two VMs and do a traceroute to each other.
I attached a public IP to the Windows VM and created a UDR to allow the traffic from the subnet to my public IP to bypass the NVA and go directly to the internet. (See Route-To-Home in the picture above).
This lets me connect to the Windows VM directly with RDP and avoid asymmetric routing.
Let’s open a PowerShell window and try to traceroute to our Linux VM.
Ummm, that doesn’t looks good…
But why? Ohhh we haven’t configured our NVA to forward the traffic at the OS level! So, since we are using our Linux NVA to act as a router/firewall between our spoke subnets, we need to allow the traffic to be forwarded from one subnet to the other, and we need to enable this in two places:
At the platform/Azure NIC level (Already done with Terraform):

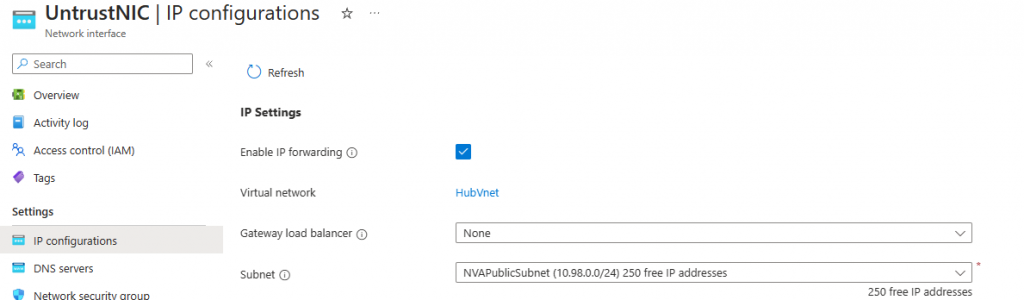
And at the OS level, for this let’s connect to our NVA Public IP using SSH, and let’s take care of the routing and iptables, with the following config script:
#!/bin/bash

# enable ip forwarding
sudo sed -i 's/#net\.ipv4\.ip_forward=1/net\.ipv4\.ip_forward=1/g' /etc/sysctl.con


# install software to save iptables on reboot
sudo apt-get update && sudo DEBIAN_FRONTEND=noninteractive apt-get install -y iptables-persistent
sudo iptables-save | sudo tee -a /etc/iptables/rules.v4


# add the routes (eth1 = private, eth0 = internet)

sudo ip route add 10.97.0.0/16 via 10.98.1.1 dev eth1
sudo ip route add 168.63.129.16 via 10.98.1.1 dev eth1 proto dhcp src 10.98.1.4


# force iptables and routing on boot
echo '#!/bin/bash
/sbin/iptables-restore < /etc/iptables/rules.v4
sudo ip route add 10.97.0.0/16 via 10.98.1.1 dev eth1
sudo ip route 168.63.129.16 via 10.98.1.1 dev eth1 proto dhcp src 10.98.1.4
' | sudo tee -a /etc/rc.local && sudo chmod +x /etc/rc.local

sudo reboot
So that’s ready! Let’s check our traffic now:
From Windows to Linux:
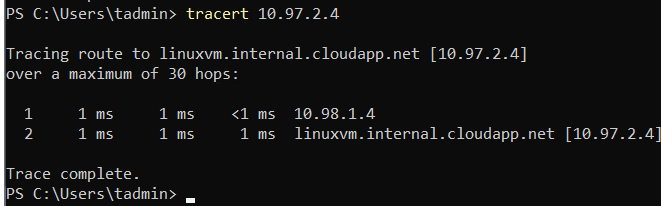
And from Linux to Windows:

Great! Our Spoke VMs use our NVA’s trust NIC to transverse the traffic. But do we have an internet connection? Well, it seems like not yet…

But why is that? Yep, that’s our second requirement, we need to configure our NVA to source NAT the traffic coming from our spoke servers (also called outbound NAT, PAT, NAT overload, etc.). Essentially, it translates our server’s private IPs to use our NVA’s public IP.
Let’s get back to our NVA’s console and we will run the following command:
sudo iptables -t nat -A POSTROUTING -o eth0 -s 10.97.0.0/16 -j MASQUERADE
This will SNAT the traffic from our spoke’s VNET network (10.97.0.0/16).
Getting back to our VMs, can they connect now?
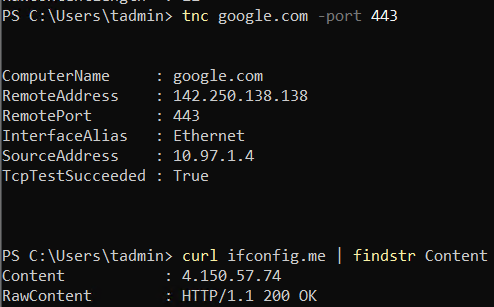
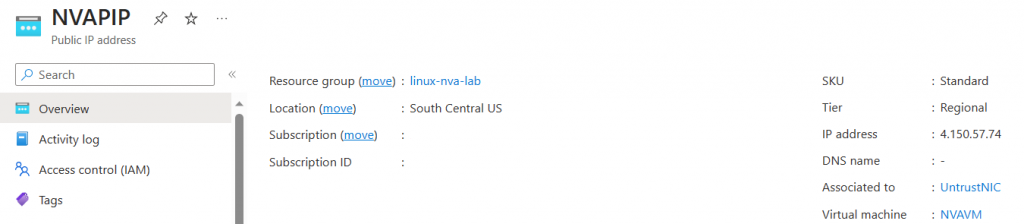
The second command (curl ifconfig.me) confirms that the public IP used by our Windows VM to navigate to the internet is our NVA’s Public IP.
Great! That’s 2/3 of our requirements, let’s go for our final step and connect our “on-prem” network to Azure.
For that, I’ve compiled the following config script:
#########################
## IP SEC / VPN Config ##
#########################


# Install strongwan - We will use strongwan to configure our S2S VPN

sudo apt-get update
sudo apt-get install strongswan strongswan-pki libstrongswan-extra-plugins -y

# Configure the IPSEC File

sudo nano /etc/ipsec.conf

# Add the following lines to your file


#########################
## Policy-Based Tunnel ##
#########################


config setup
        charondebug="all"
        uniqueids=yes
conn tunne-to-onprem
        type=tunnel
        left=10.98.0.4
        leftsubnet=10.97.0.0/16
        right=<PeerVPNIP>
        rightsubnet=10.0.0.0/16
        keyexchange=ikev2
        keyingtries=%forever
        authby=psk
        ike=aes256-sha256-modp1024!
        esp=aes256-sha256!
        keyingtries=%forever
        auto=start
        dpdaction=restart
        dpddelay=45s
        dpdtimeout=45s
        ikelifetime=28800s
        lifetime=27000s
        lifebytes=102400000


# Edit PSK

sudo nano /etc/ipsec.secrets

# Example

10.98.0.4 <peerVPNIP> : PSK "changeme123"

# Remove NAT for IPSEC traffic outbound

sudo iptables -t nat -I POSTROUTING 1 -m policy --pol ipsec --dir out -j ACCEPT

sudo iptables -t nat -A POSTROUTING -s 10.0.0.0/16 -d 10.97.0.0/16 -j MASQUERADE # This is not be needed unless you want to SNAT on-prem traffic
sudo iptables -A FORWARD -s 10.0.0.0/16 -d 10.97.0.0/16 -j ACCEPT # Allow traffic - Not needed if using above config as iptables allow it by default


# Restart the VPN for changes to take effect

sudo ipsec restart
And of course, you will need to configure the remote’s VPN Device, in my case I configured a PFSense firewall to terminate this S2S tunnel from on-prem. I will not get into the details of this, but you should be able to find config examples for your site-to-site VPN config for any device you’re using.
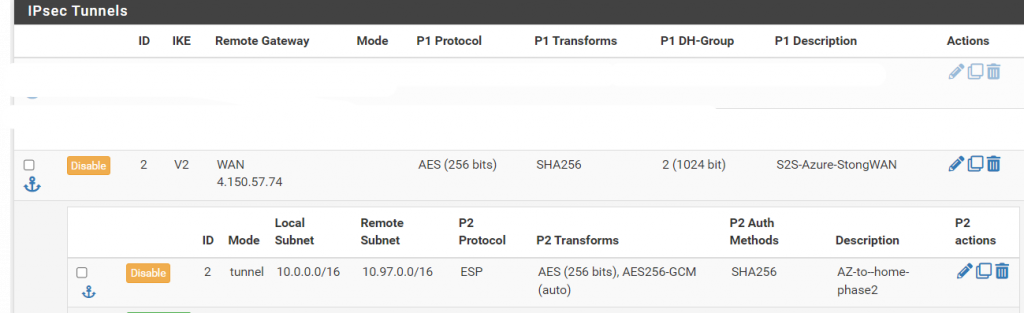
Here are a few screenshots of how my phase 1 and 2 looked:
Let’s make sure our tunnels are up and connected:
From on-prem:
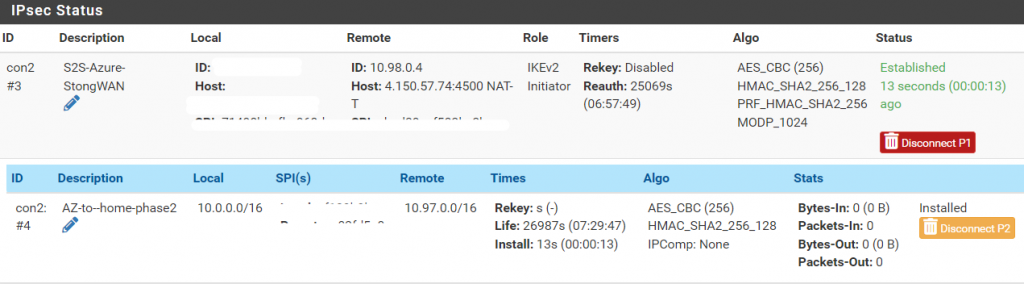
And from our NVA:

Great! Our tunnel is up and connected! Let’s do some test traffic:
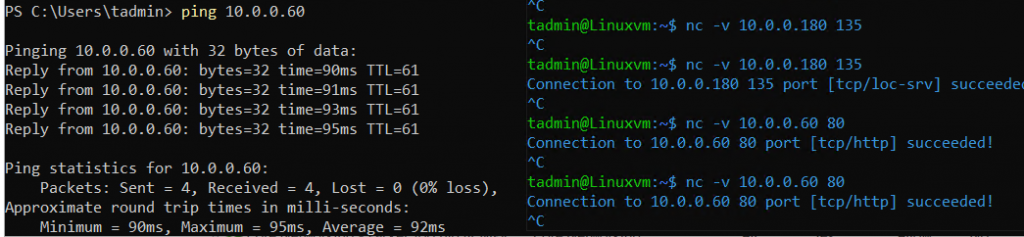
From our on-prem VM to Linux and Windows’s VMs on Azure:
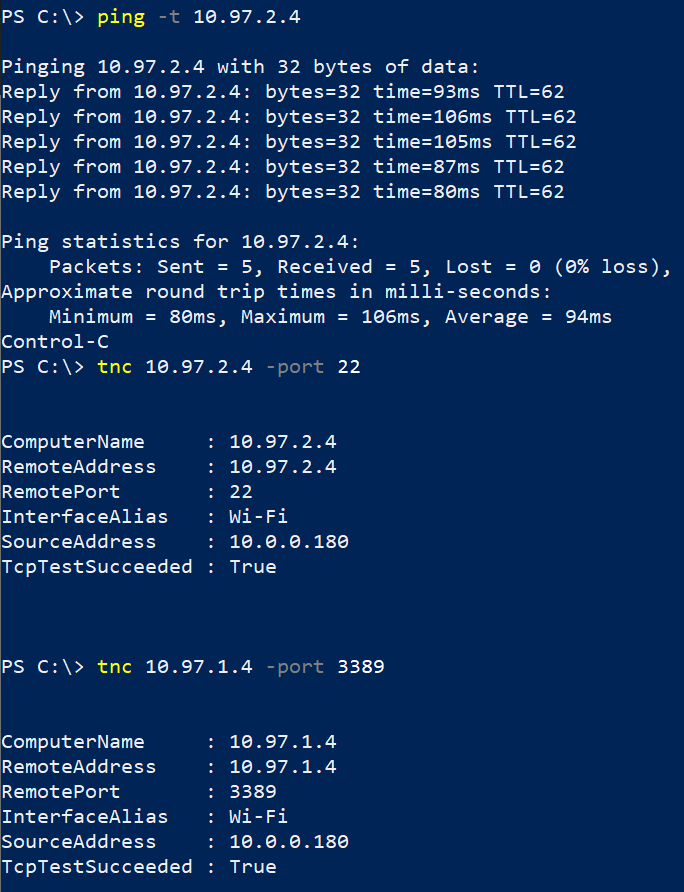
From our Azure VMs to on-prem:
Awesome, that pretty much concludes our little experiment, let’s review a few gotchas that I took care of in the Terraform repo + an additional script if you would like to use a route-based VPN tunnel instead of a policy-based one.
Gotchas and tips:
- There are a few NSG rules that are required for this connectivity and scenarios to work, the following rules are required:
Inbound

Outbound:

2. If you would like to create a route-based VPN tunnel, you may use the following config:
# Configure the tunnel interface


sudo ip tunnel add vti0 local 10.98.0.4 remote <RemoteVPNPeerPublicIP> mode vti key 12
sudo sysctl -w net.ipv4.conf.vti0.disable_policy=1
sudo ip link set up dev vti0


# Configure the VPN Routes

sudo ip route add 10.0.0.0/16 dev vti0 # Route to on-prem


# Edit IP SEC config
config setup
        charondebug="all"
        uniqueids=yes
conn tunnel21
        type=tunnel
        left=10.98.0.4
        #leftsubnet=10.97.0.0/16
        leftsubnet=0.0.0.0/0
        right=<RemoteVPNPeer>
        #rightsubnet=10.0.0.0/16
        rightsubnet=0.0.0.0/0
        keyexchange=ikev2
        keyingtries=%forever
        authby=psk
        ike=aes256-sha256-modp1024!
        esp=aes256-sha256!
        keyingtries=%forever
        auto=start
        dpdaction=restart
        dpddelay=45s
        dpdtimeout=45s
        ikelifetime=28800s
        lifetime=27000s
        lifebytes=102400000
        mark=12


# Edit the PSK - Same steps as above in Policy-based


sudo nano /etc/ipsec.secrets

# Example

10.98.0.4 <peerVPNIP> : PSK "changeme123"

# In strongSwan the IKE daemon also takes care of the routing. Since we do want to control the routing ourselves
#we have to disable this feature in the service. The option can be found in the main section of the charon configuation file
# /etc/strongswan.d/charon.conf:

sudo nano /etc/strongswan.d/charon.conf

charon {
  install_routes = no # Look for this entry and modify it as shown here
}


# Restart the VPN for changes to take effect

sudo ipsec restart
Last but not least, I want to give big shoutouts to the following blog post that offered some initial guidance to figure up some of the initial setups:
- https://docs.strongswan.org/docs/5.9/features/routeBasedVpn.html
- https://blog.sys4.de/routing-based-vpn-with-strongswan-de.html
- https://github.com/fluffy-cakes/azure_egress_nat
And that should be it for this lab, hope you enjoyed the reading, let me know what you think, and as always the best of luck in your tech journey!