
Hey there and welcome back to a new blog post! This time I wanted to create a quick guide on how to set up and get started with docker and deploying containers, additionally I will show you some of my favorite container images, let’s get started!
- VMs and virtualization
- Containers
- Install Docker
- Run an Nginx docker container
- Other container images
- Debugging container
Docker, what is Docker and what do you need it? Well, in the simplest terms, I can think of Docker as an application and platform for deploying virtualized containers, containers are similar to virtual machines (VMs), but with some major differences, let’s quickly define what a Virtual Machine (VM) and some of its components:
Virtual Machines: These are virtualized Guest operating systems hosted in a Host physical machine (server, PC) with the help of a hypervisor, they share the resources of the host machine.
Host: This is the physical machine that provides the resources for your VMs. When you create a VM you assign it resources such as vCPUs, RAM, Storage, etc.
Hypervisor: This is the program, platform, or OS that allows to creation and management of virtual machines, for example, Hyper-V, VMWare ESXi, Nutanix, Promox, etc.
So, when you create a VM you have a full OS like the one you would have on your computer, Windows, MAC OS, Linux/Unix, and so on… This is great for testing purposes and efficiency, as you could for example have Windows 11 on your PC and then create 2 virtual, one with Ubuntu and the other with Kali to learn Linux.
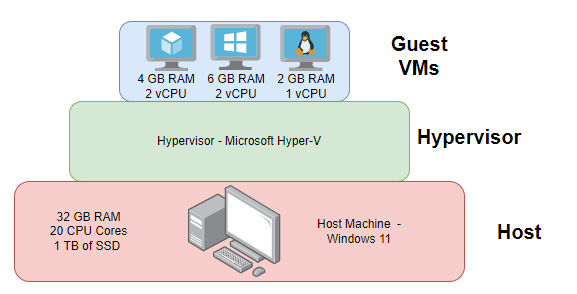
From a business perspective, virtualization allows a powerful physical server and the creation of multiple VMs within it for different functions, for example, instead of having to buy one server for each function (File server, Print server, Domain Controller server, Ticketing systems server, etc.) a business can buy one powerful server and create VMs for each of the functions, this can provide benefits such as reduced hardware to maintain and replace, less power consumption and savings, management of all servers from the Hypervisor’s console, enhanced monitoring, and much more! Now, virtualization and VMs have been out for a long time and also have drawbacks, one of them being that you have to virtualize the whole Operating System (OS), so when you think about it from a performance and management POV, you will have to install from scratch or an image each VM with a whole OS (a not so quick process) and assign it a fixed amount of resources (ex: 2 vCPU, 6GB RAM, 100GB of SSD) which can lead to resource waste as the VM may not need or use all the assigned resources which could be used for other VMs or functions.
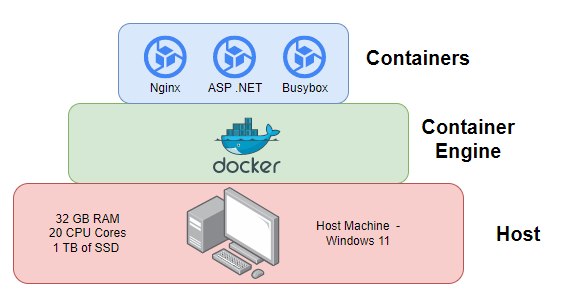
One step further in virtualization is containers, so containers are a more lightweight solution that allows you to only virtualize the function or application required, they run directly in your machine’s OS without having to use a hypervisor or virtualize the whole OS like the VMs do. Another advantage lies in the portabilities of the containers, the containers you create in one computer/server can be easily exported and run into different computers without worrying about OS or hardware compatibility issues.
Let’s get to the fun part, next, we will install docker and show the power of running some containers!
For this demo, I will use a computer running Ubuntu 20.04 LTS and will install docker in it (You can install docker desktop in Windows with WSL using the following guide).
# From the official docker doc, I will be using the convenient install script
sudo apt update
curl -fsSL https://get.docker.com -o get-docker.sh
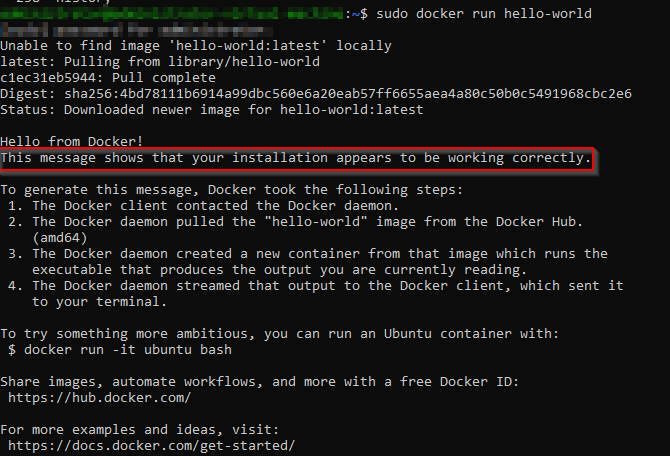
sudo sh get-docker.shTo check our Docker installation completed successfully we can run the “hello-world” container, and obtain the following output:
Awesome! Now, before we continue showing what we can do with other containers, let’s review the basic Docker commands:
# List all current containers

docker ps -a

# Create a new docker container from an image

docker run <image_name>

# List all current images

docker images

# Stop and start a container

docker start <container name or ID>
docker stop <container name or ID>

# Delete/Remove a container

docker rm <container name or ID>
Remember: docker --help and man docker when in doubt about command options/syntax. Now, let’s say we want to run a quick demo website with Nginx, in a previous post we explored how to do this in a VM, this time, let’s show how quickly we can get a test website running with docker, for this we will run:
# This will run the default docker Nginx website
# Option -p binds the container's port 80 it to the external port 8080
# The option -d runs the container in "Detached" mode
# --name is a custom/friendly name for the container
# nginx is the name of the image to run
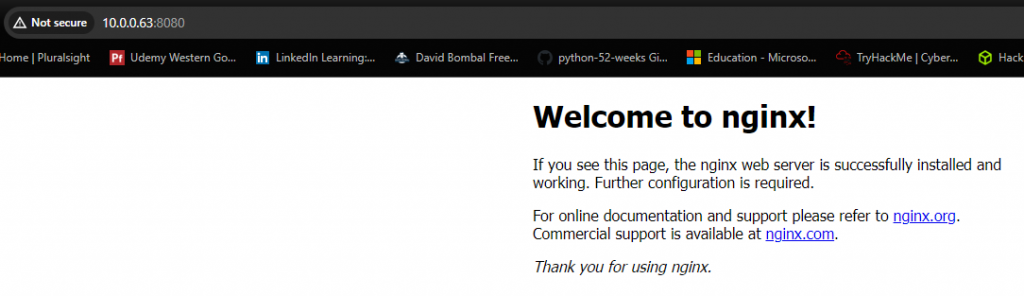
sudo docker run --name mfk-nginx -p 8080:80 -d nginxIf we access the IP of our computer on port 8080 (http://<IP>:8080) from a web browser, we should see our container running.
Sweeeet! That’s cool, what would it take if we want to customize our website a little bit? One way to do this is by binding the directories and files from our Host machine to our Nginx container config (check out the other ways on the official Nginx documentation > Managing content and Configuration files). In my local directory (/home/administrator), I will create a few custom directories and files, and bind them to the new container:
# Creating files and directories

mkdir -p nginx-docker-config/www/images
mkdir -p nginx-docker-config/conf
touch nginx-docker-config/www/index.html
touch nginx-docker-config/conf/nginx.conf

# You can edit and add your desired config to the files above
# Or use the sample config below

nano nginx-docker-config/www/index.html
nano nginx-docker-config/conf/nginx.conf

# Sample config for Index HTML file

<!DOCTYPE html>
<html lang="en">
<head>
    <meta charset="UTF-8">
    <meta name="viewport" content="width=device-width, initial-scale=1.0">
    <title>Welcome to My Website</title>
</head>
<body>
    <h1>Hello, World!</h1>
    <p>This is a simple website.</p>
    <img src="images/welcome.jpg" alt="Welcome Image">
</body>
</html>


# Sample config for Nginx conf file

 server {
    listen       80;
    listen  [::]:80;
    server_name  localhost;

    #access_log  /var/log/nginx/host.access.log  main;

    location / {
        root   /usr/share/nginx/html;
        index  index.html index.htm;
    }

    #error_page  404              /404.html;

    # redirect server error pages to the static page /50x.html
    #
    error_page   500 502 503 504  /50x.html;
    location = /50x.html {
        root   /usr/share/nginx/html;
    }
}


# Create new container with binded directories
# I am mapping this one to port 8081

sudo docker run --name mfk-nginx2 \
  --mount type=bind,source=/home/administrator/nginx-docker-config/www,target=/usr/share/nginx/html,readonly \
  --mount type=bind,source=/home/administrator/nginx-docker-config/conf,target=/etc/nginx/conf,readonly \
  -p 8081:80 -d nginx
Let’s access our machine on port 8081, and see what can we find:
Great, that works! Now, before finishing this post, let’s explore some other interesting container images and options.
- Busybox: This is a great image for debugging networking issues in container environments. We can use Busybox to run numerous utilities such as ping, traceroute, telnet, nc, nslookup, and more! We can run this container on demand with the command:
sudo docker run -it --rm busybox
- Portainer: Awesome container app to manage and visualize your containers from a GUI.
- Grafana: To create visually stunning dashboards with graphs, charts, and panels to monitor and analyze time-series data from various sources.
sudo docker run -d -p 3000:3000 grafana/grafanaThe default username/pass is admin/admin.
- PiHole: Custom DNS server, can be installed with docker compose.
Anyway, there are a whole lot of other apps plus the ones you can create and customize yourself. But wanted to share these few to share and hopefully itch your curiosity 😉
Lastly, I wanted to share the following doc and blog post I’ve found really useful when debugging container issues.
Welp, we’ve officially reached the bottom of this Docker well for now. Hope you didn’t fall in! Hope this was helpful and that you enjoy tinkering with docker. Thank you so much for reading and wish you the very best in your IT and networking journeys! I will see you again in the next post 🙂
